I’m so angry I’m going to swallow my own face
Alright. So things have been good, things have been bad, let’s leave it at that.
My internet went haywire and the service provided turned off our connection, because we were over using our “always on” broadband. Bullshit, bullshit, bullshit.
Anyway. Fashion week has hit a serious hiccup because of all this, so I’ll have to delay it a week or two.
That’s the bad. Now the good, is very very good: we got a house. For those of you who don’t know, I was away last saturday and sunday because myself and two friends were off house hunting in Letterkenny. We found one, we’re taking it, and we move in this coming saturday. Bish, bash, bosh – job’s a good’un.
I bring you four pictures of how things have gone over the last two days. Starting with a picture for January 11th and ending with today’s picture.

More pictures after the jump.
Catastrophic technical failure
Greetings followers, the mad carpenter here, trying to contact the internet via a telegram and morse code.
*Di-di-di-di-dii-di-di-dii-dii-dii*
My connection has completely asploded and it could be between 5 and 14 days to get back on a broadband connection.
So for now it’s dial up.
Oh, I’m moving this weekend. We’re moving our stuff in on Saturday, after we pay the deposit on Friday. It’s a fantastic place in the Hollywood hills of Letterkenny – Long Lane. 3 bedrooms, 2 and a half baths, massive sitting room, all the mod-cons.
It’s fantastic, and it’s 50 bucks a week each. Which is a great price.
On the whole 365 project, I’m still taking the pictures, but I’ll have to do a bulk upload as soon as I get back on broadband. I might ditch fashion week for now, and resume when i have a steady connection.
Now, my hand is getting tired with all this morse code, I’ll be back when I can. Keep the faith children.
Disconnected
The Mad Carpenter has lost his internet connection but should be back online tomorrow. He continues to take pictures and when he returns, he will post the missing pics from the 365 Project.
Fashion week, day 2
Hello there my faithful followers, and I’m glad to say that your numbers are swelling every day.
*Pinches cheek* Look how big you’re getting!
Enough of that. Today – Suit.

As you can see, when I wear a suit, I don’t half-ass it. This is my graduation suit with the addition of a top hat, tuxedo shirt and bow tie. Now, while yesterday was a nice cheap day, today is not. The suit itself cost 550 euros, but it is a very fine 3 piece Remus Uomo suit. The pocket watch was a graduation gift, and only cost around 40 euros. The top hat cost me 30 pounds on a market stall. The shoes were around 50 euros. I got the tuxedo shirt in a charity shop for around 3 euros. The bow tie, which I tied myself mind you, cost around 8 euros from a local menswear shop.
It’s often difficult to pull off a suit, and in fairness, this is the tenth picture I took in order to get me looking half decent in it.
I think you’ll agree that this is a bitchin’ suit and by paying attention to the details; pocket watch, top hat, self-tie bow tie, you’ll agree that the suit looks much better. I do think I need a bigger top hat though, just to make it look ridiculous(ly good).
Tomorrow a more muted ensemble – my melding of formal and casual.
Just a note, this post is scheduled to appear in a couple of hours, and I’m totally geeking that I can do that. But anyway, I’m having it post later because I’m off house hunting for the day in Letterkenny. Wish me luck minions.
The Mario Cube: Phase 2
Welcome to the second installment of the Mario Cube project.
When I last updated youse, the box was a mere skeleton.
But now, the box is covered in skin, the hinges are installed, and the construction phase of the box is done. All that’s left to do is to phase 3 – paint. But that’s fodder for another blog post.
The skinning of the box is a relatively simple task, but it is really fiddly. There is a great deal of shift and shimmy, a lot of nudge and bump… I’ll just say this, I’m really glad that I’ve got my new belt sander.
If you’d care to step this way, and glance downwards you’ll see the nearly finished project.
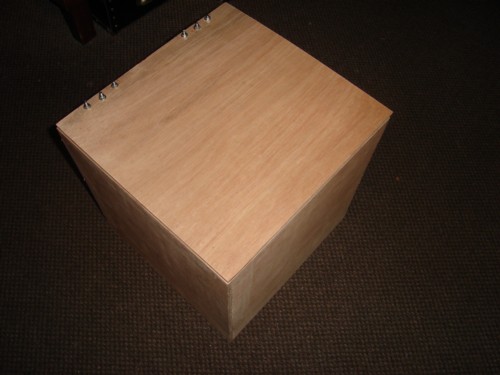
Here it is. Notice the bolts, I’ll get to those later.
Each side of the box was a little fiddly to fit, but these things usually are. I decided to have the plywood overlap on one corner of each side so that end grain would only appear once on each side. This decision also made each of the sides closer to each other in size. I tacked the plywood to the skeleton after cutting and then belt sanded three of the sides; I belt sanded the fourth after the second side was tacked in place. It made the whole thing nice and uniform. Brilliant.
Pictures of the inside and details about the bolts after the jump.
The Mad Carpenter does Fashion Week
Hello there internet.
Now, if you’ve been keeping up, I’ve been doing a 365 project, wherein I take a picture a day and post it here. If you’d be looking at the pictures, you’d realize that for the last 8 days, I’ve been wearing the same plaid shirt. Which seems lacking in fashion flair to some of you. So, in the honour of people that say I never change my clothes: Fashion Week, Day one.

It’s damn cold around here, so I’m wearing my cold weather gear. A nice warm fur trapper hat – bought in Dunnes Stores for 10 euros. A black coat, which I think is a sort of a cop looking coat – 25 euros, Lidl. Jeans, I always wear jeans because they’re just so practical and comfy – Pennys, 10 euros. And my faithful boots, check the ring detail on the side. Some shoe shop – 70 euros.
So there we are. Tomorrow, something more formal.
January Eighth

Evening blog reading community.
I’ve been awake for 24 hours doing various things for an extended period of time, so forgive me if this seems phoned in.Spent the afternoon working on the Mario Box, so I’ll do a progress post about it tomorrow.
Soon I shall be doing a fashion week, showing off the various things I play dress up in, and go out on the town in. Prepare for lots of hats, coats and jeans.
The Mad carpenter does fashion week.
That’s what i’ll call it I will.
And now – Intentional coma.
It only took six days

I received a package in the mail today.
After opening the big white package, smothered in messages that it was from the US postal service, I found a little brown box, with a little brown bow on it. My heart began to flutter because I knew it was the present from my beloved. She had told me on the day that she had sent it, and I’d been waiting eagerly every day for my wonderful little surprise to come through the door.
However today, I was out back working on the Mario Box project, and mema brought it out back to me. I immediately downed tools, rushed inside and opened up the package. I took a moment to savour the little brown box inside. It’s got this sort of suede stuff on it. It’s a nice box…
Enough about the box already Dave. What was INSIDE the box I hear you growl through impatient teeth. Well, why tell you, when I can show you?
….After the jump.
Quick, quick, quick, QUICK….Made it!

Well that was a bit of a mad dash. Here’s today’s picture, and if you’re wondering what I’m pondering…
“Why do I have bed head at midnight?”
That said though I only got up at 7pm, after going to sleep at noon. Ah the life of an unemployed blogger: it’s all action.
1 UP! The Mario Cube Project
Hello St. Louis!
That is, if there’s anyone out there from St. Louis reading this…
Anyway, you may have been wondering: why, on a blog called “the mad carpenter” has there not been any carpentry?
Well, today there is. This project is titled “The Mario Cube”
I’m sure most of you that have had any experience of the Nintendo 64, the SNES or the Wii will know their anchor character – Mario. One of the early modern video game characters, and much beloved by what must now be two (or three) generations of gamers.
Practically the first task one must complete in the original Mario game is to hit a box with a question mark on it in order to obtain a mushroom that makes you grow in size.

The box that I am creating, paying homage to, is that box.

The build:
Step one
I started off by buying the necessary wood: 1 x 1 inch pine and some 1/4 inch plywood. I planned on making the cube 12 x 12 x 12 inches, but knowing my very basic style of carpentry, there would be wiggle room, and as long as it works well, I’m happy with it. So, about 12 inches cubed.
I decided to build a skeleton of pine, and then skin it with plywood. I could have used mdf, but it’s more expensive. I created 2 mitres frames which would be the top and bottom of the box, and then attached 4 upright pieces, using metal brackets, to form the rest of the cube. All the attachment of the skeleton is done using screws
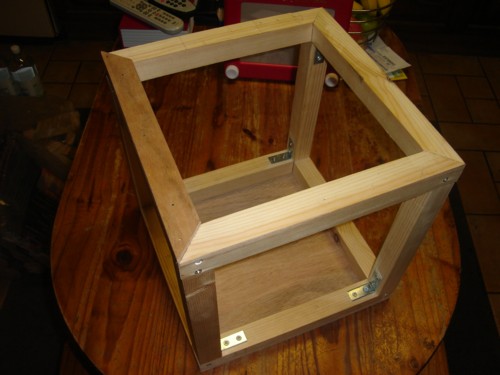
Step two after the jump read more…