Hello St. Louis!
That is, if there’s anyone out there from St. Louis reading this…
Anyway, you may have been wondering: why, on a blog called “the mad carpenter” has there not been any carpentry?
Well, today there is. This project is titled “The Mario Cube”
I’m sure most of you that have had any experience of the Nintendo 64, the SNES or the Wii will know their anchor character – Mario. One of the early modern video game characters, and much beloved by what must now be two (or three) generations of gamers.
Practically the first task one must complete in the original Mario game is to hit a box with a question mark on it in order to obtain a mushroom that makes you grow in size.
The box that I am creating, paying homage to, is that box.
The build:
Step one
I started off by buying the necessary wood: 1 x 1 inch pine and some 1/4 inch plywood. I planned on making the cube 12 x 12 x 12 inches, but knowing my very basic style of carpentry, there would be wiggle room, and as long as it works well, I’m happy with it. So, about 12 inches cubed.
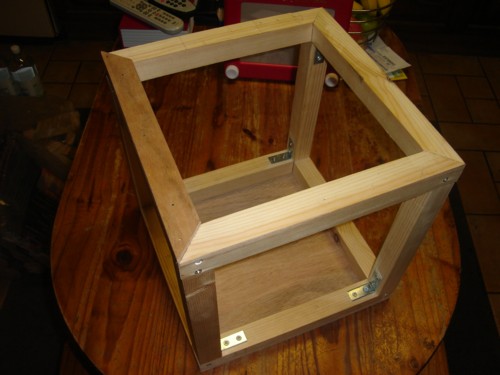
I decided to build a skeleton of pine, and then skin it with plywood. I could have used mdf, but it’s more expensive. I created 2 mitres frames which would be the top and bottom of the box, and then attached 4 upright pieces, using metal brackets, to form the rest of the cube. All the attachment of the skeleton is done using screws

Step two after the jump
Step two
The second step is skinning the box with the 1/4 inch ply. I’ve only done the bottom so far, but it’s just a case of cut, nail, and sand it flush with the skeleton. You may have noticed a piece of darker wood nailed to the top frame of the box: this is a spacer piece, and there will be 2 others like it on the adjacent lengths of the top. Hinges will be attached to the 4th side, and the spacers will offset the size of the closed hinges.
Still trying to puzzle out how to attach the hinges to the 1/4 inch thick top. Screws are too long… probably need glue… bolts. Hadn’t even thought about bolts.
Anyway my faithful readers, this is as far as the project has progressed to date, despite this being a Christmas present for a friend.
Coming soon: The remained of part 2 – covering the cube, installing the hinges.
Then part 3 – Painting the cube in the Mario Box Style.
-The Mad Carpenter.
…Just for your viewing pleasure.

I can’t wait to see the completed project!
“I can’t wait to see the completed project!”
Neither the hell can I! =D
*whistles, waiting*
wow! The box will be good, and I am impressed by your skill and talent. Is that an Etch-a-Sketch in the background? I love those!
When the hell are you going to finish that thing???
Don’t you dare shave! I like your neck fuzz. I got my hair cut today. And can you come home for Paddy’s day???
I can’t believe you shaved!!